Category Archives: Tech

How To> Organize: iPhone Photos into Albums

Plug in your camera-phone to your computer and you may be prompted with photos going back as far back as your first iPhone. Anytime I plug my iPhone in to charge, a window pops up to share photos with me that I took dating all the way back to 2008! As an artist who finds beauty in everything, it turns out I have more than 1,000 photos of every random flower, sunset, and tasty food I felt inspired to capture.

Take a photo, save a memory. But how and where will you know to find each moment? And what about all the 10s of duplicates or misshots that seem to just be taking up space? Thank Tech there developers have been adding more and more ways to organize the plethora of photos we accrue into folders, or in Apple’s case: albums.

How To Organize iPhone Photos into Albums

  1. Open the Photos app, and enter into your albums page. Ensure you are in the Albums section by tapping the Albums emblem on the bottom of the page. Funny things may happen if you are operating in the cloud of Photo Stream.
  2. Tap to open your Camera Roll. The Camera Roll stores ALL of your photos, from legacy and last-taken. Unless they are also in your Photo Stream*, deleting a photo from the Cameral Roll will remove it from your camera completely.
  3. Tap the Edit button in the upper right-hand corner of the screen.
  4. Select one to any amount of photos to select them. Multi-selecting allows you to pre-create album groupings. If you know in advance how you want to organize the set, you can select only the relevant photos, and add on more later.
  5. Tap the Add To button near the bottom, and then select either an ‘Existing Album’ or a ‘New Album’ to file the photos in.**
  6. Tap to select the final confirmation, and you now have an album of your own creation.

Note that even when you forge new folders, the original photos still exist the confines of your Camera Roll.  Albums can be mighty handy when you want to share specific sets of photos with your friends via email, slideshows, or to your webpage.

More tips and instructions for fast photo faring soon to come!

*The Photo Stream is Apple’s cloud storage for your photos. Photos taken when you’ve enalbed Photo Stream will remain live and accessable on the cloud even when you delete them from the Cameral Roll.
**I hate ending with a proposition, any ideas on how I could rephrase the sentence to arrange otherwise? Thanks!

{For more information, visit my sources! About.com and these guys over at Joby.}
How To> Harmonize Your Browsers Eyes (aka Sync Tabs and Bookmarks)

Saving successful, helpful, or otherwise generally cool websites is one of the advantages of the internet: highlighting the good stuff to come back to later. But what happens when you forgot to send yourself a link while at a friends? Not to mention easily sharing all of those links with your work computer… ” Enter one more neat Cloud accessory that will save you some angst.

Currently there are many different ways to save information that you will find valuable later: from syncing your devices directly to programs like Pinterest and EverNote that you can view from anywhere with internet access. I have found that the most convenient (once properly set up) is to use Chrome universally. Chrome uses GMail accounts to harbor all your data, so once you log into your GMail account on Chrome, the feeling of safety will wash over you almost instantly.

  1. Choose of your one Gmail emails as your “browsing account.” Don’t deny it, you have at least 3 emails. The key here is to log into any browsing, bookmarking, or tabbing consistently with the same account. Chrome has a ton of helpful information to help you log in from any device that you can find here.
  2. Download the Chrome App for your mobile device.
  3. When prompted, log into your Gmail browsing account.
  4. Make sure tab syncing is enabled.
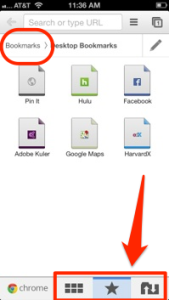
  5. Use the 3 buttons on the bottom to to navigate through your recent mobile history, bookmarks, and desktop/other Chrome App tabs.

bmarksh2

Tapping the Star button on the bottom lead directly to “Mobile Bookmarks” which threw me off for a second. To get back to the main bookmarks tab, tap the Bookmarks text on top. Note: When operating Chrome mobile, any new bookmarks will be saved in this new auto-organized ‘Mobile Bookmarks’ section.

Accessing tabs on your other devices is just as easy. Simply tap the Sync Tabs button on the bottom right and a beautiful list of anything opened on your account will pop up.* Also helpful is the ‘Recent Tabs’ button (the little grid-guy to the right of the star) because it reveals your most recent closed windows. Never leave home without your history again!

*I can only imagine the parental and partner tracking that can be sourced from all this Clouding around.

The above article is a summary of the chrome instructions found here.

How To> Take Notes Remote

Notes in their very essence are an in transit activity. You write a note now so you can remember an idea later. It is not surprising that the word ‘note’ originates from gnoscere, the Latin term for “to know”, because by saving information for your future-self to know.

Modern note taking has expanded far beyond the small pads seen used by pulp detectives and reporters. Slips of paper can get ruined by water damage or lost in a mountain of receipts; there is no cloud to back up and organize your notes. And thus, for those searching for an answer to the “Remote Note” dilemna, here are a few approaches to taking your ink to the screen:

  • Tablet, with on screen keyboard. Touch screen devices from phones to large tablets come with built in keyboards to type with. If you can get used to the angle, you just need your device and no other tools to be an apt pupil
  • Tablet, with blue tooth/plugged in keyboard. Typing on a physical keyboard can be much easier to record lots of info. However, though keyboards are getting smaller, but they still count as one extra feature you need to carry around when the moment of noted inspiration strikes.
  • Tablet with stylus. Stylus’ are small, like pens, so they are not a huge burden to add to your tablet pouch, especially if there is a built in slot so you won’t lose it. Pressure fidelity is ever improving, and Apps like DailyNotes (shown in photo) even allow users to hand write notes, as well as typed ones.
  • Pen-and-paper notebook. If you just can’t let go of the feeling of ink gliding over a page, just make sure you get a note book to keep your notes centralized. Just remember to back up (save the physical pages somewhere safe) after you’ve transfered them to the cloud.